How to Partition a Hard Disk


Partitioning your hard drive is a great way to organize your files, folders, and applications into multiple virtual drives. Although there are advantages to having multiple physical drives, the rise in multi-terabyte hard drives has changed the game. Partitioning a single drive is a viable method to give your system that multi-drive functionality with plenty of space on each, without shelling out for a second drive.

If you just bought a new drive and want to split it up, you must partition it before using it. Whether you have a new drive or want to partition an existing one, the process is much the same. Fortunately, learning how to partition your hard drive using Windows 10 is quick and easy. If you follow the steps below, we’ll help take you from a single-drive system to one with as many virtual drives as you want.

If you’re looking to create new volumes for making a backup, we’d still recommend you use one of the best external hard drives instead.

Also, keep in mind that we’ll be using the term “hard drive” throughout this piece, but the same steps and procedures will apply to a SSD as well, Windows treats them the same anyways.

Windows Disk Management
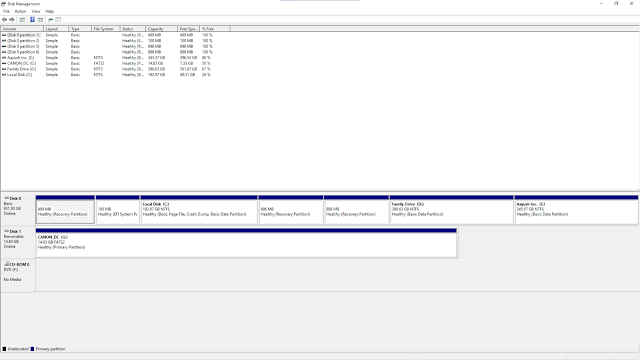

The simplest way to partition your new or existing hard drive is with Windows’ built-in Disk Management tool. Although some third-party applications have slightly expanded feature sets, the standard Windows tool is perfectly capable of creating new partitions. Although the below steps are specifically for Windows 10 systems, they are also applicable to 8.1, where the process is much the same.

Step 1: Use the Windows search box to search for Disk Management. This can alternatively be done by right-clicking the windows start menu and opening Disk Management

Step 2: Select the hard drive you want to partition from the list of drives available. If it is a new drive, skip to step 4. If it is an existing drive with files and your operating system installed on it, you must create some unallocated space before you can partition it. Right-click and select Shrink Volume from the resulting drop-down menu.

Step 3: Your PC will then calculate how much free space you can allocate to the new partition. Once completed, it will ask you how much of it you want to use. If you’re going to use all the free space on the hard drive, click the Shrink button. If you’re going to specify the eventual partition size, input it in megabytes in the respective field before hitting Shrink.

The process can take a minute depending on the speed of your drive — when complete, you’ll have new unallocated space shown next to the corresponding physical drive in the bottom half of the Disk Management screen.

Step 4: Right-click the unallocated space and select New Simple Volume from the resulting menu.

Step 5: Follow the on-screen instructions and select the size of the volume (the default will use all unallocated space) and the drive letter.

Step 6: It’s wise to format new and old drives when creating a new partition. When given the option, select to do so. For File System, choose NTFS. You can also add a volume label (a name) if you like ( it would be called local disc otherwise). You can leave the allocation unit size at default. Select Quick Format if you are short on time — it rarely requires a full format.

Step 7: Continue to click through the Next buttons and, finally, hit Finish to create the volume. Your hard drive will now have a new partition with its very own designation. You’ll be able to see it and all the information about it on the Disk Management page.Third-party alternatives

If the manual process involves too many clicks for your taste, there are alternatives. You can find a long list of third-party tools that help with partitioning your hard drive using Windows 10. However, there are only a few we’d recommend using. Here are a handful of options we’ve had pleasant experiences using.


Comments

Popular posts from this blog

Facebook adds carts to WhatsApp to make shopping easier

WhatsApp said on Tuesday it is adding a new shopping feature to its app as the Facebook -owned instant messaging service looks to court more merchants and invite a larger portion of its 2 billion userbase to shop. The instant messaging platform, where business accounts already process messages from more than 175 million people, said it is adding carts to WhatsApp around the world ahead of the holiday shopping season. Carts are aimed at making it easier for consumers to buy multiple items from a business, and for merchants to keep better track of order inquiries and manage requests. WhatsApp said it is adding the new feature after early positive response from some businesses who tested it recently. On WhatsApp, users will now see the option to add items to the cart. When done, users will be able to send the order request as a message to the business. WhatsApp said carts are going live for users across the globe today. (You can read the complete how-to flow here .) In recent months, W

Google Play Music is now officially dead

We've known for more than a year that Google Play Music's days were numbered. Its death had even been officially announced , but it's now really, really real.  Open the Android app now and you'll likely be greeted by a white splash screen with a Play Music logo that morphs into a YouTube Music one. Bold text tells you Google Play Music is no longer available and explains that you can transfer your whole library to YouTube Music. Two buttons are provided below that, one to kickstart the transfer process and another to manage your data. The latter takes you to the Google Play Music site where you can download and delete your full library, and delete your recommendation history. Once you're done, the app's widget should disappear by itself from your home screen if you had added it there. What Google didn't think of is an easy way to manage your locally-stored data on your phone. If you've downloaded music for offline listening, you can't do that anywhe

Microsoft Edge is going to get a huge time-saver feature

Microsoft is testing a new feature that will automatically group your tabs in Chromium Edge so you don’t have to. The feature is currently rolling out to Microsoft Edge Canary and it’s hidden behind an experimental flag. Like Google Chrome, Microsoft Edge also allows you to group tabs, but this is possible only when you activate an experimental Edge. Tab Groups could save you a whole lot of time by allowing you to group tabs and keep your browser neatly organized. With Tab Groups, you can select related tabs and create a cluster to keep your browser window neatly organized. Currently, Edge and Chrome require you to create the groups manually. To address this problem, Microsoft is now enabling support for automatic grouping process. As per the flags menu, Edge will automatically and intelligently create tab groups for you and organize the tabs when you open links from the same website. For example, if you visit Wikipedia and open its pages in new tabs, Edge will intelligently include a